
Purpose of this document
Account Schedules can be used to arrange and report on accounts from the Chart of Accounts in meaningful ways, such as Financial Statements. Users can set up various layouts to define the information they want to extract from the Chart of Accounts.
This document illustrates the step-by-step process of creating Account Schedules by extracting information from the Chart of Accounts and to aid in processes that cannot be directly viewed via the Chart of Accounts.
Ceres Object release 5.00.00 is required for the functionality described in this document.
Table of Contents
Overview
One of the main purposes of Account Schedules is to provide a place for calculations that cannot be made directly in the Chart of Accounts, such as creating subtotals for groups of accounts, which can be acted on further. Users can also compare two or more Account Schedules and Column Layouts by using formulas. This kind of comparison provides the ability to:
- Create customized financial reports without using the Report Designer.
- Create as many account schedules as needed, each with a unique name.
- Set up various report layouts and print the reports with the current figures
Creating Account Schedules
1. Account Schedules can be accessed from Departments/Financial Management/General Ledger/Reports and Analysis/ Analysis & Reporting/Account Schedules.

2. To create a new Account Schedule from the Account Schedule Name Page, select New on the Home Tab of the Ribbon.

3. From the Account Schedule Names Page, complete the necessary fields.

Name: Enter the name of the Account Schedule, this must be unique.
Description: Enter a description of the Account Schedule.
Default Column Layout: Select a column layout name that you want to use as a default for this account schedule. To see the column layout names in the Column Layout Name table, click the Assist Button to the right of the field.
Analysis View Name: Select an analysis view name that you want to use as a default for this account schedule. If you enter an analysis view name here, the account schedule will use analysis view entries from the selected analysis view. If you leave this field blank, the account schedule will be based on general ledger entries.
Financial Period Description: You can also set up a Financial Period Description which allows you to use variables to set up a custom period description for the report based on the date filter entered when running the report. Valid variables are as follows, with examples if a date range of 07/01/14..06/30/15 was entered:
%1 - Beginning date’s year (2014) %5 - Ending date’s year (2015)
%2 - Beginning date’s month number (07) %6 - Ending date’s month number (06)
%3 - Beginning date’s month name (July) %7 - Ending date’s month name (June)
%4 - Beginning date’s day (07) %8 - Ending date’s day (30)
A Financial Period Description of “As of %7 %8, %5” with date example above, would print as “As of June 30, 2015”.
Validate G/L Account Usage: Determines which G/L Account warning will display when account schedules are previewed or printed.
Note that the G/L Acct. Sched. Reminder field must be toggled on the General FastTab of the General Ledger Setup before a warning will display. Both fields were added as part of the Finance Roadmap enhancements. The options are:
Skip None - Do not skip any G/L Account and instead print a list of all G/L Accounts (Balance Sheet and Income Statement) that are not represented on this account schedule.
Skip Balance Sheet - Skip Balance Sheet G/L Accounts only and print a list of Income Statement G/L Accounts that are not represented on this account schedule.
Skip Income Statement - Skip Income Statement G/L Accounts only and print a list of Balance Sheet G/L Accounts that are not represented on this account schedule.
Skip Balance Sheet and Income Statement - Skip all Balance Sheet and Income Statement G/L Accounts only and do not print a list of Balance Sheet or Income Statement G/L Accounts that are not represented on this account schedule.
Account Schedule Lines
1. To define the Account Schedule Lines, select Edit Account Schedule from the Home Tab of the Ribbon.

2. Complete the necessary fields.

Row No.: A number for the account schedule line. Row numbers are optional, and the same number can be used on more than one line. The rows with the same number are then treated as a group. For example, if the row number is included in a formula in the Totaling field, it will represent the sum of all the lines that have that row number. If the Insert Accounts function is used, this field is automatically copied from the No. field in the chart of accounts.
Description: Text that will appear on the account schedule line. If the Insert Accounts function is used, this field is automatically copied from the Name field in the G/L account list.
Totaling Type: Determines which accounts within the totaling interval, specified in the Totaling field, will be totaled. The options are:
Posting Accounts - The total is calculated from amounts in posting accounts in the chart of accounts. This is the default
value.
Total Accounts - The total is calculated from amounts in total and end-total accounts in the chart of accounts.
Formula - The total is calculated from amounts in other rows in the account schedule. The formula is entered in the
Totaling field.
Set Base For Percent - Used to insert a column that displays the percentage of a total. The formula in the Totaling field on this line is used to calculate the total on which the percentage is based. This line will not appear on Account
Schedule reports.
Note: If the Insert Accounts function is used, accounts that have an Account Type of Total or End-Total on the chart of accounts will be assigned the totaling type Total Accounts. All other lines will automatically be assigned the totaling type Posting Accounts.
Totaling: Indicates which accounts are totaled on this line. This field is filled in based on the contents in the Totaling Type field. If the Formula totaling type is assigned to the account schedule line, enter a formula that includes row numbers (or totaling intervals) from the account schedule. If the totaling type is Posting Accounts or Total Accounts, enter an account number (or totaling interval) from the chart of accounts.
When creating formulas, use the following symbols:
Addition: +
Subtraction: -
Multiplication: *
Division: /
Exponentiation: ^
Parentheses: ()
Percentage: %
Row Type: Determines how the amounts in the row are calculated for the period defined in the Date Filter field on the report or page. The options are:
Net Change - The total is calculated using the total changes from the start to the end of the specified date range.
Balance at Date - The total is calculated using the total of all entries from the initial transaction in Ceres through the
date at the end of the specified date range.
Beginning Balance - The total is calculated using the total of all entries from the initial transaction in Ceres to the last entry before the start of the specified date range.
Amount Type: Determines the type of entries that are included in the amounts in the account schedule row. The options are:
Net Amount - The calculated amount includes debit and credit entries.
Debit Amount - The calculated amount includes only debit entries.
Credit Amount - The calculated amount includes only credit entries.
Show: Determines whether the account schedule line is printed on the report. The options are:
Yes - The row is printed.
No - The row is not printed.
If Any Column Not Zero - The row is printed unless all amounts on the row are equal to zero.
When Positive Balance - The row is only printed if the balance of the amounts on the row is positive.
When Negative Balance - The row is only printed if the balance of the amounts on the row is negative.
New Page: If selected, there will be a page break after the current account when the account schedule is printed.
Bold, Italic and Underline: If selected, the row contents are bolded, italicized, or underlined. Only bold formatting is displayed in the Acc. Schedule Overview Page.
Show Opposite Sign: If selected, debits in this row are displayed in reports as negative amounts (that is, with a minus sign) and credits are displayed as positive amounts.
Dimension Totaling Filters: Dimension values or dimension value ranges that will be used to filter the amounts shown in the row. You will need to associate an Analysis View with the Account Schedule before to display and filter by a shortcut dimension.
Creating Column Layouts
1. Column Layouts can be accessed from Departments/Administration/Application Setup/Financial Management/General/Tasks/Column Layouts.

2. To create a new column layout from the Column Layout Name Page, click on New from the Home Tab of the Ribbon.

3. Enter the necessary fields.

Name: Enter the name of the Column Layout, this must be unique.
Description: Enter a description of the Column Layout.
Analysis View Name: Select an analysis view name that you want to use as a default for this account schedule. If you enter an analysis view name here, the account schedule will use analysis view entries from the selected analysis view. If you leave this field blank, the account schedule will be based on general ledger entries.
Column Layout Lines
1. To define the Column Layout Lines, select Home/Edit Column Layout Setup. Once a Column Layout is defined, it can be assigned as a default to any existing account schedule.

2. Complete the necessary fields:

Column No.: Used to identify the line for the column. The column numbers are optional and the same column number can be used on more than one line. The columns with the same number are then treated as a group. For example, if the column number is included in a formula, it will represent the sum of all the lines that share the column number.
Column Header: The text in this field will be printed on reports that include the column.
Column Type: Determines how the amounts in the column are calculated. The amounts are calculated for the period defined in the Date Filter field on the report or page as follows:
Formula - The column displays amounts calculated from amounts in other columns in the account schedule. Enter the
formula in the Formula field.
Net Change - The column displays the net change in the account balances during the period.
Balance at Date - The column displays the account balances at the end of the period.
Beginning Balance - The column displays the account balances at the beginning of the period.
Year to Date - The column displays the net change in the account balances from the start of the fiscal year to the end of the period.
Rest of Fiscal Year -The column displays the net change in the account balances from the end of the period to the end
of the fiscal year in which the period ends.
Entire Fiscal Year - The column displays the net change in the account balances for the fiscal year in which the period ends.
Ledger Entry Type: Determines the type of ledger entries that are included in the amounts in the account schedule column. The options are:
G/L Entries - The total is calculated from general ledger entries.
G/L Budget Entries - The total is calculated from general ledger budget entries.
Amount Type: Determines the type of entries that are included in the amounts in the Account Schedule column. The options are:
Net Amount - The amount includes both credit and debit entries.
Debit Amount - The amount includes debit entries only.
Credit Amount - The amount includes credit entries only.
Formula: If Formula is selected as the Column Type, enter a formula for the line. The result of the formula is displayed in the column when the Account Schedule is printed. Use this field to perform calculations on other columns. Other columns are referenced through their column number. The calculation symbols are the same as those used in the row formulas.
For example, to calculate the difference in percentage of the G/L Entries and the Budget Entries enter the following formula: 100*(Column No. of the G/L entry column/ Column No. of the G/L Budget entry column -1)
Show Opposite Sign: If selected, debits in this column are shown in reports as negative amounts (that is, with a minus sign) and credits are shown as positive amounts.
Comparison Date Formula: Date formula that specifies which dates must be used to calculate the amount in this column. Microsoft Dynamics NAV uses this formula to calculate the amount from the comparison period in relation to the period represented by the date filter on the report request. Use the standard time periods of W(eek), M(onth), Y(ear), or Q(uarter) to create the formulas. For example, -1Y is the same period one year earlier.
Comparison Period Formula: Specifies which accounting periods to use when users are calculating the amount in this column. An accounting period does not have to match the calendar, but each fiscal year must have the same number of accounting periods, even though each period can be different in length. Ceres uses the period formula to calculate the amount from the comparison period in relation to the period represented by the date filter on the report request.
The abbreviations for period specifications are:
P = Period
LP = Last period of a fiscal year, half-year, or quarter
CP = Current period of a fiscal year, half-year, or quarter
FY = Fiscal year
Show: If selected, the amounts in the column are shown in reports. Note that a maximum of five columns in an account schedule layout can be shown in the printed report. The options are:
Always - All amounts in the column are always shown. This is the default value.
Never – If selected, the column does not appear on reports; it is used only for calculation purposes.
When Positive – If selected, only positive amounts (amounts that are positive before Show Opposite Sign is applied) are shown in the column.
When Negative - Only negative amounts (amounts that are negative before Show Opposite Sign is applied) are shown in the column.
Rounding Factor: This value represents the Rounding factor for amounts in the column. The default value is None, no rounding. Note that amounts on printed reports will be rounded. For example, if 1000 is selected, all amounts are shown in thousands.
Note: The amounts in the Acc. Schedule Overview Matrix Page are not rounded.
Business Unit, Global Dimensions and Dimensions 3 and 4: Totaling fields used to create column layouts that show global dimension information across columns.
When the Column Layout is not linked to an Analysis View, the Global Dimensions are available in the Column Layout Page. When the Column Layout is linked to an Analysis View, the Dimensions specified in the Analysis View are displayed in the Column Layout Page. Analysis Views are linked to Column Layouts in the Column Layout Names Page, in the Analysis View Name field.
Account Schedule Overview
1. To access the Account Schedule Overview select Departments/Financial Management/General Ledger/Reports and Analysis /Analysis & Reporting/Account Schedules.
2. Select the Account Schedule you want to run, and then select Overview from the Home Tab of the Ribbon.

Note: If a Validate G/L Account Usage option is associated with the Account Schedule, a message similar to the one below will pop up indicating which G/L Accounts are not included in the Account Schedule. This same message will pop up when printing the Account Schedules.

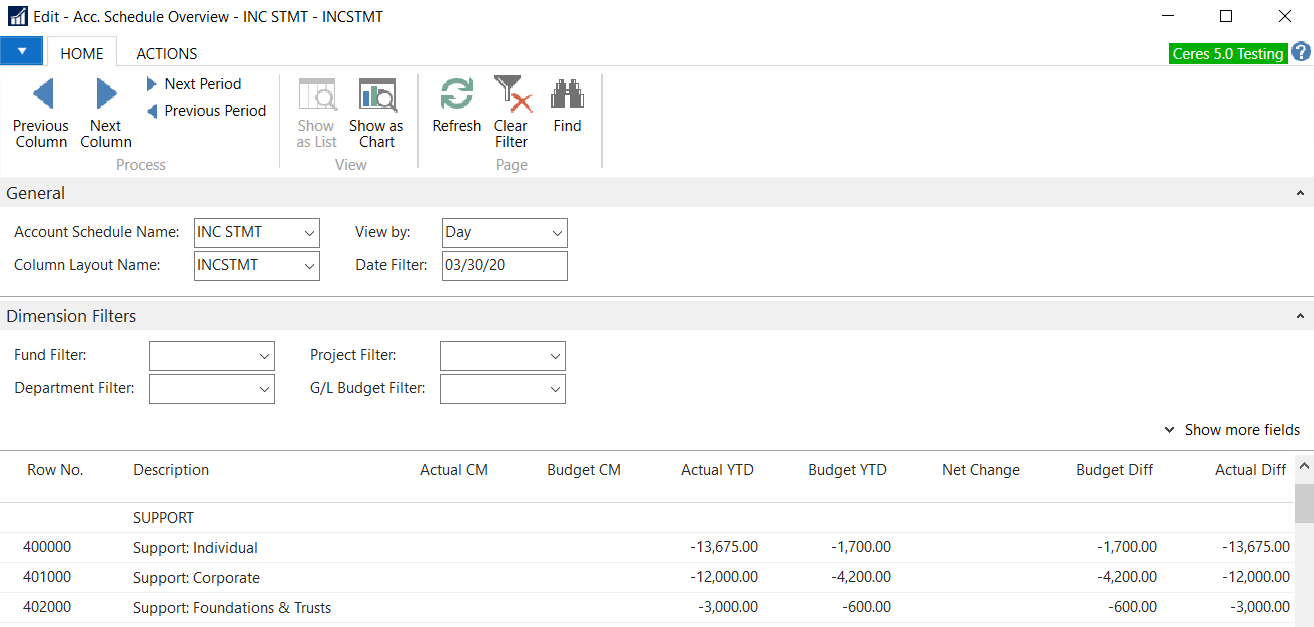
3. Complete the necessary fields.

Account Schedule Name: Select the name of the account schedule you want to use to view the entries. To see the existing account schedules, click the Assist Button to the right of the field.
Column Layout Name: Select the name of the column layout that you want to use to view the entries. To see the existing column layouts, click the Assist Button to the right of the field.
View By: Select how you want to view the entries by. The options are Day, Week, Month, Quarter, Year, or Accounting Period.
Date Filter: Enter the date range that you want to view the entries by.
Dimension Filters: Select the dimensions that you want to view the entries by.
4. To update the Account Schedule, click on the Actions Tab of the Ribbon and select Recalculate.

5. Entries will display based on the values and filters selected above.
6. Print the Account Schedule Overview by selecting Print Landscape or Print Portrait on the Actions Tab of the Ribbon. Verify and/or update the filters and then click on the Print button to print the Account Schedule.

7. Send the Account Schedule Overview to Excel by selecting Export to Microsoft Excel from the Actions Tab of the Ribbon.
Select from the options: Create a New Document or Update Existing Document.


Related Topics
- Chart of Accounts Overview
- Budget Overview
- GL Dimension and Dimension Values
- Analysis Views
Was this article helpful?
That’s Great!
Thank you for your feedback
Sorry! We couldn't be helpful
Thank you for your feedback
Feedback sent
We appreciate your effort and will try to fix the article